
Here’s how to un-brick the Xiaomi Mi Router 3C if it gets stuck in a System Error state (steady orange LED showing on the front of the unit) and upload a fresh firmware to bring it back to life.
-
- Switch to the ROM section.

-
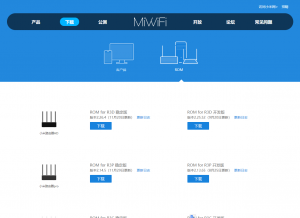
- Scroll down to the R3C ROM listing.

Note: For my sanity I will refer to the red LED as orange) as it’s clearly not red.
- Visit the MiWiFi website and download the latest firmware (website is in Chinese, I recommend using Google Translate to navigate this website)
- Switch to the ROM section
- Download the Stable ROM for R3C (latest release at time of writing is 2.12.15)
- Connect an ethernet cable to the WAN Port ethernet connector (that’s the blue port closest to the power supply connector).
Connect the other end of the ethernet cable to your computer/laptop (if your laptop does not have a ethernet port use a USB to Ethernet adapter) - Find a paper clip and when ready pull the power cable on the Xiaomi Mi Router then press down firmly on the Reset button and re-connect the power supply
- Continue to hold down the Reset button for up to 10 seconds or until the front LED colour changes from steady orange (System Error) to flashing orange (Safe Mode)
- If the LED colour fails to change to flashing orange after some time rinse and repeat by pulling the power cable and re-connecting until the unit enters Safe Mode
- Here’s where things get interesting… if an IP address is automatically assigned to your device you can skip to step 6 (thanks DD).
If an IP address has not been automatically assigned to your device then jump back to the first step and move the ethernet cable from the WAN Port to LAN Port 1 (shown as a single dot, beside the other LAN Port with two dots) on the Xiaomi Mi Router 3C.
You will need to manually assign a IP address on your computer as the DHCP server on the router is not enabled in Safe Mode, set the following network options for your ethernet connection:
- IP address: 192.168.31.5
- Subnet mask: 255.255.255.0
- Default gateway: 192.168.31.1
- Preferred DNS server: 192.168.31.1
- Open up your preferred browser and enter http://192.168.31.1 into the address bar
- Upload the firmware file you downloaded earlier and wait a few minutes
- If the front LED does not change to blue within 5 minutes pull the power cable and put it back in and wait another few minutes for the router to boot up
- Check for nearby WiFi SSID’s, the Xiaomi Router should be available to connect and configure
- Undo your ethernet connection changes and configure your Xiaomi Router
That’s it.


