Moving MitID from your old Android phone to a new phone
NemID makes it so easy to transfer your NemID from phone to phone by scanning the QR code and approving the transfer. It’s not that intuitive with MitID, yet.
(Note: MitID if you are reading this please add an in-app migration tool)
Here’s how to transfer your MitID app from your old Android phone to a new Android phone. This assumes you already have an active MitID account and can receive SMS to confirm the temporary activation code sent to you from MitID.
Logging in to MitID self-service
Jump link to the NemID to MitID migration page, or follow the below steps. The jump link may change over time so I’ve provided the steps. If the jump link works go onto the next section.
- Visit the MitID website (in English)
- Open the Menu and select Get started with MitID
- Under the Create MitID with NemID heading click the Get MitID here button
- Hit the Get MitID with NemID button to open the NemID login portal
Generating a new activation code via MitID self-service
- Enter your NemID login and approve the NemID request on your phone or by entering your card code to access the MitID
- From the Select MitID authenticator screen under MitID app click the Select button
- Open the MitID app on your new Android phone
- From the Activate your MitID app screen enter your MitID username and new Activation page on the MitID app on your new Android phone
- Give the MitID app permission to read your SMS and it will auto-insert the temporary activation code sent to your via SMS
That’s it. You’re good to go with MitID on your new Android phone!
Configuring WordPress after installing OpenLiteSpeed on Google Cloud Platform
Bitnami is great, until it comes to updating the stack. I’m now using OpenLiteSpeed which gives me better control over updating the stack without having to regularly migrate to new instances.
Here’s my cheatsheet for setting up OpenLiteSpeed to run WordPress.
- Run the openlitespeed-wordpress Marketplace installer
- Assign a Static IP from VPC Network > External IP addresses
- Turn off DNS routing on Cloudflare for the A record and the www C record
- Update the A record to your allocated static external IP address
- Connect via Google Cloud SDK Shell with your preferred SSH user
gcloud beta compute ssh --zone "us-west1-b" "[username]@[instance name]" --project "[project name]"
- Complete the OpenLiteSpeed installer with Let’s Encrypt
- Turn DNS routing on again in Cloudflare
- Add your SSH user to the www-data user group
sudo usermod -a -G www-data [username]
- Run the WordPress installer
That’s it!
Danskprøve A2 eksempel – Danish test A2 example
Update: Download links at UIM are back! I’ll keep these files here for posterity.
I’ve e-mailed Udlændinge- og Integrationsministeriet (UIM) as they no longer host the Danskprøve A1 or Danskprøve A2 exam examples.
In the interim to UIM resuming hosting of the Danskprøve A1 or Danskprøve A2 exam examples I am providing the Danskprøve A2 exam example here. Good luck with your exam!
(I do not have a copy of the Danskprøve A1 exam example to share)
Switching from Synology’s WordPress end-of-life package to Web Station
I installed the WordPress package when setting up my Synology NAS, it’s been running without fault for years but due to lack of package updates has reached end of life. Time to migrate to Web Station!
The WordPress package maintained by Synology is locked to PHP 5.6 and Apache HTTP Server 2.2 meaning there’s no upgrade path for either PHP or Apache HTTP Web Server.
Here’s how to migrate from the Synology WordPress package to Web Station:
- Connect to DSM and log in as an Administrator, or user with read/write access to Web Station files at /web/ as well as the following DSM Apps
- File Manager
- Package Centre
- Web Station
- Open File Station and navigate to the /web/wordpress/ directory
- Copy the /web/wordpress/ directory contents to a new temporary directory away from Web Station (e.g. /backup/wordpress/…)
- Open Package Centre
- Search for “Apache” and install the Apache HTTP Server 2.4 package
- Search for “PHP” and install the PHP 7.3 package
- Open Web Station
- From the Status tab ensure that both Apache HTTP Server 2.4 and PHP 7.3 are listed within the Back-end Packages section and marked as Installed.
- Switch to the PHP Settings tab
- Create a new Profile by clicking the Create button, set the following fields within the popup dialog:
- Profile Name: Default profile
- Description: Default PHP 7.3 profile
- PHP version: PHP 7.3
- Enable PHP cache
- Select any PHP extensions you require, if unsure check against the default extensions already enabled from the default PHP 5.6 profile on the PHP Settings tab
- Click OK to create the new Profile
- Switch to the Virtual Host tab
- Create a new Virtual Host by clicking the Create button, set the following fields within the popup dialog:
- Hostname: wordpress
- Port: 80 / 443
- Document root: Click the Browse button and navigate to the /web/wordpress/ directory
- HTTP back-end server: Apache HTTP Server 2.4
- PHP: Default Profile (PHP 7.3)
- Click OK to create the new Virtual Host
- Open Package Centre
- Search for “WordPress” and select Uninstall from the Actions dropdown
- Accept the confirmation prompt that you wish to uninstall this package
- When prompted if you wish to delete the WordPress database leave the tickbox unchecked and do not fill the database login fields; we want to keep the existing WordPress database
- Click Uninstall to remove the WordPress package
- Open File Station and copy the temporary backup directory (e.g. /backup/wordpress/…) back to /web/wordpress/
- Open Web Station and switch to the Virtual Hosts tab
- Ensure that the Sub-folder Name column for the wordpress Virtual Host is still set as /web/wordpress, if this is blank edit the Virtual Host and re-link it to /web/wordpress/
- That’s it!
Open up your browser and navigate to your WordPress site to confirm the migration was successful. You can now change the HTTP back-end server and PHP version at any time via Web Station! Pretty nifty. 🙂

Hardware build list for a close distance passing unit
Tired of being close passed when commuting and not knowing whether you have a legitimate MPD (Minimum Distance Passing) violation to forward to authorities?
This is a multi-part Post where I will be posting build instructions and Python scripts to interface with the Maxbotix MB8450 ultrasonic sensor (an industrial fit-for-purpose ultrasonic sensor) to log distances over time and generate a readable log file that can be overlayed ontop of front and rear camera footage within RaceRender or VIRB Edit (RIP DashWare). If I get it working I’ll also include how to sync GoPro’s with Bluetooth/RC support to start recording when the RPi Zero commences sensor logging so front/rear footage is synced.
Here’s the build list for building your own close distance passing unit for measuring the distance between your right-most handlebar edge and passing vehicles.
- Raspberry Pi Zero (Datasheet)
- A battery pack capable of an output voltage of 5V at 2A and above, e.g. Topeak Mobile Powerpack 6000 mAh (Datasheet)
- Maxbotix MB8450 Car Detection Sensor (Datasheet)
- A USB micro cable to connect the battery pack to the RPi Zero
-
- Raspberry Pi Zero with case.

-

- Topeak Mobile Powerpack 6000 mAh

-
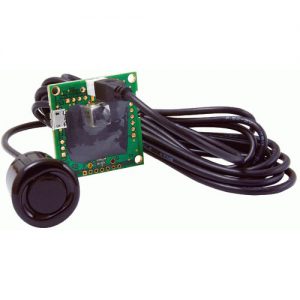
- Maxbotix MB8450 ultrasonic sensor

What’s in the list?
Ultrasonic sensor: The Maxbotix MB8450 is a high performance USB proximity detection sensor that is weather resistant and intended for vehicle detection within vehicle kiosks, ATMs, and bank drive-through environments. It is widely supported, easy to integrate with and its supported range from 50cm to 500cm makes it ideal for this application. In real-world tests it reliably returns distance echos of 0.3s with expected performance benefits (increased echos per second) when interfaced via C program over Python scripts.
The MB8450 is made up of two components, the ultrasonic sensor (transducer) and the PCB logic board.
- The sensor is weather resistant and can be mounted on the right-hand edge of the handlear; or anywhere on the bike frame where its beam is not obstructed. It provides range data to the PCB logic board.
- The PCB logic board processes the range data, cleans it up and passes it onto the RPi Zero via the USB connector. It is not weather resistant and needs to be protected.
Battery pack: The Topeak Mobile Powerpack 6000 mAh has dual USB outputs supporting up to 2A making it ideal for powering the RPi Zero, it turns on automatically when a current draw is detected and powers off shortly after devices cease. The battery pack can be mounted on the handlebar stem, anywhere on a bicycle frame using a GoPro mount or with some effort under the seat.
RPi Zero & PCB board: Due to the length of cabling from the ultrasonic sensor to the PCB board I chose to keep the PCB board of the ultrasonic sensor and RPI Zero within the saddle bag with a single USB micro cable running into the saddle bag. The PCB board and RPi Zero due to their small size could be mounted within a “tool box water bottle” or within a self-contained, weather resistant storage box.
Gallery
-
- Topeak Mobile Powerpack 6000 mAh


What’s next?
I’ll be posting RPi Zero build scripts and the Python scripts to generate log files when able including BitBucket repo link, a little time limited at the moment due to other projects. Thanks for reading.

Working Windows 10 tutorial for the Dell XPS 15 9550 + Razer Core X + GeForce GTX 970
I’ve been researching eGPU’s and compatibility with the Dell XPS 9550 for over a year and started 2019 committed to purchasing the Razer Core X eGPU enclosure and Gigabyte GeForce GTX 970 to resolve the thermal throttling and fan noise issues affecting the XPS series when used as a workhorse or gaming Ultrabook.
Getting it to work through trial and error sucked. Driver conflicts.
Conflicting device resources. BIOS firmware updates. Thunderbolt firmware updates.
This walkthrough should save you the frustration I went through.
The end result is fantastic! Here’s the benefits:
- Dramatically lowered thermal profile for the XPS 15 even with the lid closed; no more throttling!
- No fan noise coming from the XPS 15 even when under load (CSGO, video encoding, heavy Chrome GPU usage)
- Didn’t need to apply thermal pads to MOSFET’s or re-paste the CPU and GPU
- Consistently better framerate without thermal throttling when playing CSGO and improved responsiveness in general usage across multiple screens (2 x Dell U2414H 24″ monitors)
Here’s the walkthrough:
- Seat the GeForce GTX 970 in the Razer Core X enclosure
- Connect power to the Razer Core X enclosure
- Do not connect any USB devices to your monitors yet. *1
- Do not connect the Razer Core X USB C cable to the XPS 15 9550 yet. *2
- Run Windows Update and ensure recent updates have been applied
- Restart Windows if any updates were installed
- Ensure the following Dell software packages have been installed:
- Dell XPS 15 9550 1.9.0 System BIOS
- Intel Thunderbolt Controller Driver
- Intel(R) Thunderbolt(TM) 3 Firmware Update
- Intel Thunderbolt Controller Driver
- Restart Windows if any of the above Dell software packages were installed
- Install Razer Synapse 2
- Install NVIDIA GeForce Experience
- Restart Windows if any of the above software packages were installed
- Open NVIDIA GeForce Experience and from the Drivers tab install the latest GeForce Game Ready Driver
- Restart Windows if required
- Open Device Manager from the System screen (START + Pause/Break) *3
- Expand the Display adapters group
- Right click NVIDIA GeForce GTX 960M and select Disable device *4
- While keeping the Device Manager window opened with the Display adapters group in focus open the Task Manager (right click the taskbar and select Task Manager)
- Within the Task Manager window select the Performance tab to see the GPU 0 item listed under CPU, Memory and Disk 0/Disk 1 *5
- Connect the Razer Core X USB C cable to the XPS 15 9550
- Over the next 30 seconds you should see the following:
- a prompt from Thunderbolt Software to allow device chaining, close it without answering *6
- the Device Manager window refresh several times
- a new “Unknown VGA device” appear within Device Manager
- the “Unknown VGA device” dissapear and be replaced with “NVIDIA GeForce GTX 970”
- hopefully no BSOD! *7
- the “NVIDIA GeForce GTX 970” device status will change from a question mark, to a notice, to finally a prompt to restart
- Do not restart Windows at this point
- Right click “NVIDIA GeForce GTX 970” and select Update drivers *8
- Within the Task Manager window you should see a new GPU 1 entry showing “NVIDIA GeForce GTX 970”
- Shut down Windows with the Razer Core X still connected
- Connect your USB devices to your monitors
- Start Windows and when prompted by Thunderbolt Software select “Allow connect” for device chaining over Thunderbolt.
- Open Task Manager and from the Performance tab ensure that the GeForce GTX 960M is not visible and that the GeForce GTX 970 is visible
That’s it! 🙂
Gallery


*1: Thunderbolt 3 supports USB device chaining but introducing new USB devices before the eGPU is configured and working may introduce new issues.
*2: Connecting the Razer Core X to the XPS 15 9550 before having the NVIDIA software ready will result in BSOD’s as the onboard GeForce GTX 960M will conflict with the Core X’s GeForce GTX 970 for the same system resources.
*3: This one’s because I am paranoid. You may be able to skip this step.
*4: Disabling a GPU hardware device is not permanent. I found after each restart that the GeForce GTX 960M was re-enabled.
*5: You may need to double click the graph to expand the view so you can select the Performance tab within the Task Manager window
*6: We will allow all Thunderbolt device chaining once the GTX 970 is working.
*7: If you experience a BSOD when connecting the
Razer Core X ensure that the onboard GeForce GTX 960M is disabled from Device Manager
*8: If the Update driver option is not available disconnect the Razer Core X, restart Windows then follow steps 14 onwards
BIOS password recovery for ASUS laptops
To resolve a power button failure issue on an old ASUS UX32VD I needed to update the BIOS via EZ-Flash which as would happen was password protected. The BIOS platform used on this particular model has a known rescue password list to allow access.

Setting up a Cloudflare SSL certificate for Bitnami WordPress on Google Cloud Compute Engine
Bitnami WordPress on Google Cloud Compute Engine does not out of the box ship with SSL turned on, site owners need to secure communication to and from their website using SSL.
Here’s how to configure SSL using a free Cloudflare SSL certificate for Bitnami WordPress on Google Cloud Compute Engine.
Creating certificate files with Cloudflare
First we generate and download the SSL certificate files from Cloudflare.
-
- Open up your site profile on Cloudflare.com
- Switch to the Crypto tab
- Within the Origin Certificates section click the Create Certificate button
- Ensure the Let Cloudflare generate a private key and a CSR option is set to RSA
- Click Next
- With the Key format field set to PEM (Default) highlight and paste the contents of the Origin Certificate and Private Key blocks into separate new files on your Desktop:
- Origin Certificate: server.crt
- Private Key: server.key
Configuring Apache on your WordPress Bitnami instance
- Now we connect with SSH to the hosting server; your Google Cloud Compute Engine instance. You can do this via the Google Cloud Platform > Compute Engine > VM Instances > Connect with SSH or with your preferred terminal client.
- Open an SSH session to your Google Cloud Compute Engine instance
- Navigate to the
/opt/bitnami/apache2/conf/directory with the following terminal command:cd /opt/bitnami/apache2/conf/
- Delete or rename the existing server.crt and server.key files in this directory (I prefer to rename them to server.crt_legacy and server.key_legacy):
 sudo mv server.crt server.crt_legacy

 sudo mv server.key server.key_legacy
- Create two new files in their place:
 sudo touch server.crt

 sudo touch server.key
- With your preferred terminal text editor paste the contents of the two Cloudflare certificate files mentioned above into these new files on your hosting server
 sudo nano server.crt

 sudo nano server.key
- Restart the Apache service
sudo /opt/bitnami/ctlscript.sh restart apache
Enable SSL within Cloudflare
- Open up your site profile on Cloudflare.com
- Switch to the Crypto tab
- Change the SSL dropdown from Flexible to Full
- Change the Always use HTTPS option to On
- Change the Automatic HTTPS Rewrites option to On
That’s it!

Toggle the System Monitor (CPU and memory) overlay on the Mazda Connect
Displaying the current CPU and memory usage of the Mazda Connect system helps to diagnose audio stuttering and slow screen changes common when using the Maps or third-party Apps (Android Auto, Speedometer, etc.).
Here’s how to toggle the system monitor overlay on the Mazda Connect system:
- Hold down Music + Back + Pwr/Mute for several seconds
- The system monitor overlay will appear in the top-right corner of the screen
- Release the buttons and on the touch screen select and hold the overlay element for several seconds to show the Linux performance monitor
- To hide the Linux performance monitor and system monitor overlay hold down Music + Back + Pwr/Mute for several seconds
That’s it 🙂
Gallery


Source: Mazda3Revolution

Turning off PageSpeed and OPcache in Bitnami Apache for Google Cloud Platform
Here’s how to turn off the Google PageSpeed module within Apache and PHP’s OPCache functionality that is enabled by default within Bitnami instances on Google Cloud Platform.
-
- Establish a terminal session to your Google Cloud Platform instance with your preferred terminal client (e.g. Putty).
- Open up /opt/bitnami/apache2/conf/httpd.conf with your preferred file editor and find the following lines:Include conf/pagespeed_libraries.conf
Include conf/pagespeed.conf - Comment them out to match the following lines:
# Include conf/pagespeed.conf
# Include conf/pagespeed_libraries.conf - Save changes and return to terminal prompt.
- Open up /opt/bitnami/php/etc/php.ini with your preferred file editor and find the following line:opcache.enable=1
- Comment it out and disable opcache.enable by matching the following lines:
# opcache.enable=1
opcache.enable=0 - Save changes and return to terminal prompt.
- Restart the Apache service with the following command:
sudo /opt/bitnami/ctlscript.sh restart apache
That’s it 🙂