
Xiaomi Mi Router 3C recovery from System Error (Orange/Red LED)
Here’s how to un-brick the Xiaomi Mi Router 3C if it gets stuck in a System Error state (steady orange LED showing on the front of the unit) and upload a fresh firmware to bring it back to life.
-
- Switch to the ROM section.

-
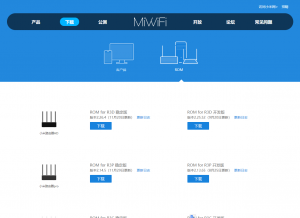
- Scroll down to the R3C ROM listing.

Note: For my sanity I will refer to the red LED as orange) as it’s clearly not red.
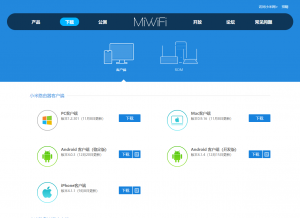
- Visit the MiWiFi website and download the latest firmware (website is in Chinese, I recommend using Google Translate to navigate this website)
- Switch to the ROM section
- Download the Stable ROM for R3C (latest release at time of writing is 2.12.15)
- Connect an ethernet cable to the WAN Port ethernet connector (that’s the blue port closest to the power supply connector).
Connect the other end of the ethernet cable to your computer/laptop (if your laptop does not have a ethernet port use a USB to Ethernet adapter) - Find a paper clip and when ready pull the power cable on the Xiaomi Mi Router then press down firmly on the Reset button and re-connect the power supply
- Continue to hold down the Reset button for up to 10 seconds or until the front LED colour changes from steady orange (System Error) to flashing orange (Safe Mode)
- If the LED colour fails to change to flashing orange after some time rinse and repeat by pulling the power cable and re-connecting until the unit enters Safe Mode
- Here’s where things get interesting… if an IP address is automatically assigned to your device you can skip to step 6 (thanks DD).
If an IP address has not been automatically assigned to your device then jump back to the first step and move the ethernet cable from the WAN Port to LAN Port 1 (shown as a single dot, beside the other LAN Port with two dots) on the Xiaomi Mi Router 3C.
You will need to manually assign a IP address on your computer as the DHCP server on the router is not enabled in Safe Mode, set the following network options for your ethernet connection:
- IP address: 192.168.31.5
- Subnet mask: 255.255.255.0
- Default gateway: 192.168.31.1
- Preferred DNS server: 192.168.31.1
- Open up your preferred browser and enter http://192.168.31.1 into the address bar
- Upload the firmware file you downloaded earlier and wait a few minutes
- If the front LED does not change to blue within 5 minutes pull the power cable and put it back in and wait another few minutes for the router to boot up
- Check for nearby WiFi SSID’s, the Xiaomi Router should be available to connect and configure
- Undo your ethernet connection changes and configure your Xiaomi Router
That’s it.

How to connect the Xiaomi Mi Gateway to Domoticz
Out of the box the Xiaomi Mi Gateway does not allow other network-based devices to integrate with it, with a little bit of effort though you can enable LAN support for integration with Domoticz or other smart home platforms.
Here’s how to connect the Xiaomi Mi Gateway to Domoticz:
- Supply power to the Xiaomi Mi Gateway (you do not need to hard reset this device to enable LAN support)
- Open up the MiHome App (Android and App Store)
- From the Profile > Settings screen set to the Location field to “Mainland China”
- Open up the device detail screen for the Gateway device
- Click the triple dots button in the top-right corner of the screen to open the More screen
- Open the About screen
- At the bottom of the screen keep tapping the version number until a notice appears
- From the same screen open the Local Area Network Communication Protocol screen
- Slide the toggle element for “Local Area Network Communication Protocol” to enabled
- Note down the Password detail for later use in Domoticz (if the Password detail is blank or shows “password” click Confirm and re-open this screen
- Click the Confirm button to save changes and return to the More screen
- Open the Network Info screen and note the IP address for later use in Domoticz
- Switch to Domoticz and open up the Setup > Hardware screen
- From the Add new hardware section select Xiaomi Gateway from the Type list
- Set the Remote Address to the Xiaomi Mi Gateway IP address referenced above
- Set the Port Number to 9898
- Set the Password to the Xiaomi Mi Gateway password detail referenced above
- Click Add to add the new Xiaomi Mi Gateway to Domoticz
- Open up the Setup > Devices screen and check for new devices
That’s it 🙂
Give it some time for Domoticz to discover the new devices and you’re away, have fun!

Hiding the Bitnami corner banner on new Google Cloud Compute Engine instances
By default new Bitnami instances show a corner banner on all pages. To remove this connect to your Google Cloud Compute Engine instance via SSH and enter the following commands:
- sudo /opt/bitnami/apps/wordpress/bnconfig –disable_banner 1
- sudo /opt/bitnami/ctlscript.sh restart apache
- sudo /opt/bitnami/ctlscript.sh restart nginx
That should be it. If you get the terminal error “Error: There has been an error.” running the bnconfig command try the following:
- cd /opt/bitnami/apps/wordpress/conf
- sudo nano httpd-app.conf
- Comment out the following line:
Include “/opt/bitnami/apps/wordpress/conf/banner.conf”
to…
# Include “/opt/bitnami/apps/wordpress/conf/banner.conf”
- Save changes
- sudo /opt/bitnami/ctlscript.sh restart apache
- sudo /opt/bitnami/ctlscript.sh restart nginx
That’s it! 🙂

How to change the Home address on the Mazda Connect Maps App
Setting the Home address on Mazda’s Connect Navigation App is done during the first-time setup of the navigation App, set it and forget, but it’s not obvious how to change the Home address at a later time.
Here’s how to update the Home address on the MZD Connect Navigation App:
- Start your Mazda car and wait for the Mazda Connect platform to load
- Open the Navigation App
- Select Favourites from the Navigation menu
- Highlight the Home menu option
- Press and hold down the Commander button down for up to 5 seconds *
- Select Edit to update the Home address
- Set your City/Suburb, followed by Street and Number
- Save your changes
That’s it! 🙂
* The Commander button is shown as the main dial in the lead image above this Post that you use to interact with the Connect platform whilst driving.
Source: Mazdas247.com

Re-map the Calculator keyboard key to Play/Pause on Windows 10
Here’s how to re-map the default Calculator keyboard “shortcut key” to instead send the Play/Pause media command under Windows 10; alot more useful!
This guide is aimed at the Amazonbasics Wired Keyboard but applies to any keyboard making use of the standard Windows media/shortcut key codes. A requirement is that you are using a supported media player including iTunes, Spotify, Windows Media Player or VLC.
- Download Command Line Media Controller (it’s free) and copy it to the Program Files (x86) directory
- Open up the Registry Editor (regedit64.exe) by clicking the Start button and typing regedit into the search bar
- Expand Computer\HKEY_LOCAL_MACHINE\SOFTWARE\Microsoft\Windows\CurrentVersion\Explorer\AppKey\18
- Create a new String with the Value name: ShellExecute
- Set the String Value data to: “C:\Program Files (x86)\Command Line Media Controller\CLMControl.exe” Spotify -pp
- Click OK
That’s it! Hit the Calculator keyboard shortcut with Spotify open and it will toggle play/pause. Happy listening! 🙂

Recovering from a “dead” hard disk on the XPS 15 9550
I brought my XPS 15 9550’s hard disk back from the brink today. I hope this will help other affected XPS 15 9550 users or just Windows users in general.
The XPS 15 9550 was powered down as usual and on reboot would go directly from the Dell POST logo to the Dell diagnostic software (Enhanced Pre-Boot System Assessment). That’s not a good sign.
After running through common diagnostic steps with Dell Support a new hard drive was ordered and installation scheduled for the following day (unit was covered under a Next Business Day support contract). As Dell Support put it the hard disk was dead without any chance of recovery… or was there? 😉
Here’s how to recover your Windows instance in the case where the hard disk hardware is still being detected and simply has no UEFI boot entries:
- Open BIOS Setup by powering up the XPS 15 and tapping F12
- Open the Settings > General > Boot Sequence screen
- Ensure that UEFI is selected under Boot List Option
- Click Add Boot Option
- Provide a Boot Order Name (it can be anything, I used
Bootx64) - Select the available File System List
- Set the File Name to:
\EFI\Boot\bootx64.efior click the ‘…’ button and expand the EFI > Boot directory and select bootx64.efi before pressing OK - Click OK to create the new EFI boot entry
- Select the new EFI boot entry
- Click Apply
- Click Exit
Fingers crossed! That’s it, I hope you’re back up and running again. 🙂

Step-by-step setup for the Xiaomi Plant Flower Care
Here’s a walkthrough for setting up the Xiaomi Plant Flower Care BLE device on an Android device.
- Unpack the device from the packaging
- Install the free Mi Home App (Google Play Store/iTunes App Store)
- Turn Bluetooth on your Android device
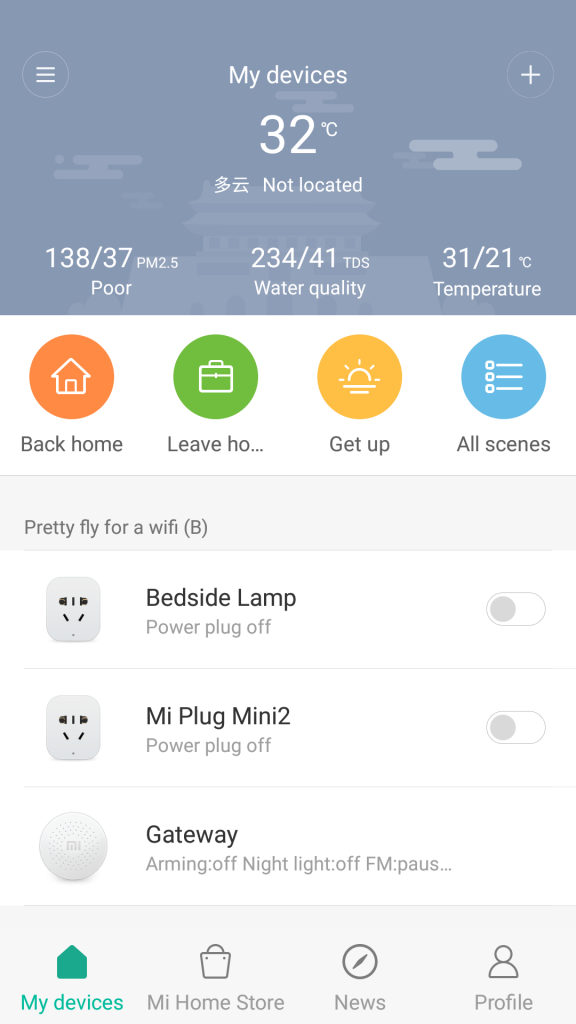
- Open the Mi Home App
- Sign in or create a new Mi Home account
- From the opening My Devices screen click the top right “+” (plus) symbol
- Select “Add device” from the dropdown menu
- Pull the exposed plastic tab from the Xiaomi Plant Flower Care device to turn it on, if you have previously done this open the cover and unset/re-set the battery
- When the “Flower care” device appears select it
- Wait while the Bluetooth connection is established and the latest device firmware is installed
- From the initial Devices tab select the Flower Care device
That’s it! You’re good to go!
Screenshots
-

- Install the Mi Home App via the Play Store or App Store

-
- From the Dashboard screen of the Mi Home App click the “+” (plus) symbol in the top-right corner to add a new device.

-
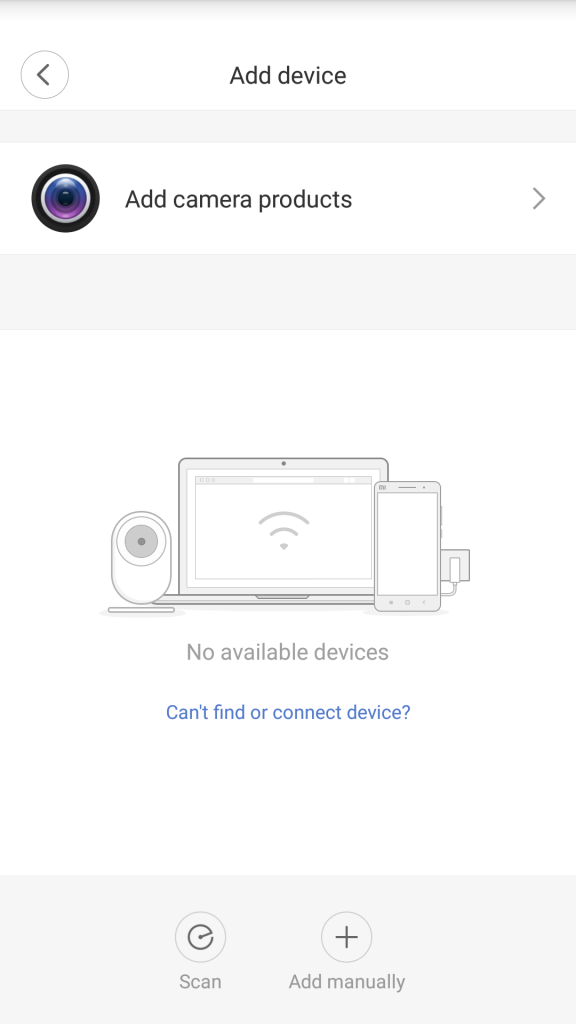
- Pull the plastic tab on the Xiaomi Plant Health Care device and hit Scan.

-
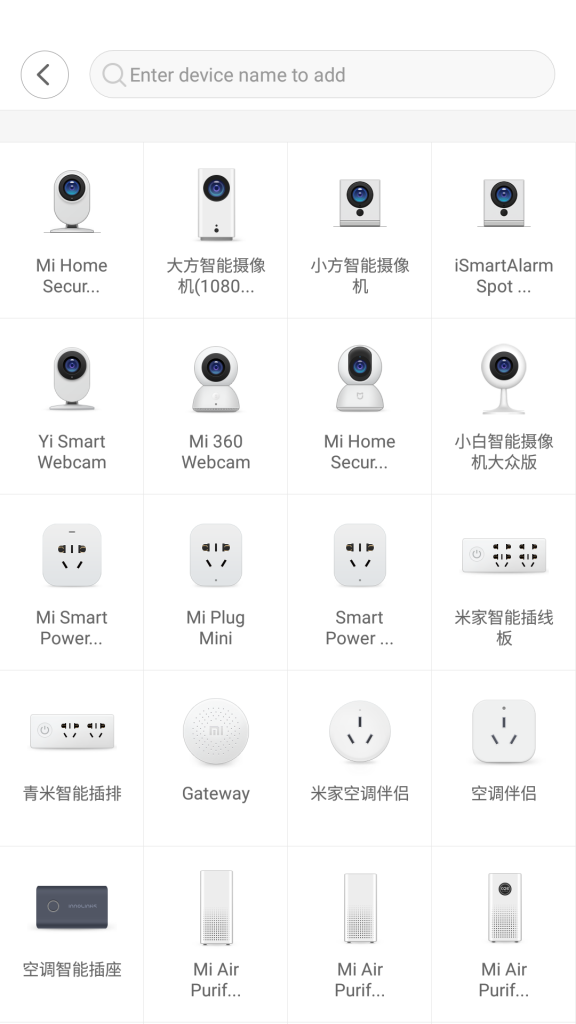
- If the Mi Home App does not automatically detect the Xiaomi Mi Plant Health Care device, search for it manually.

-
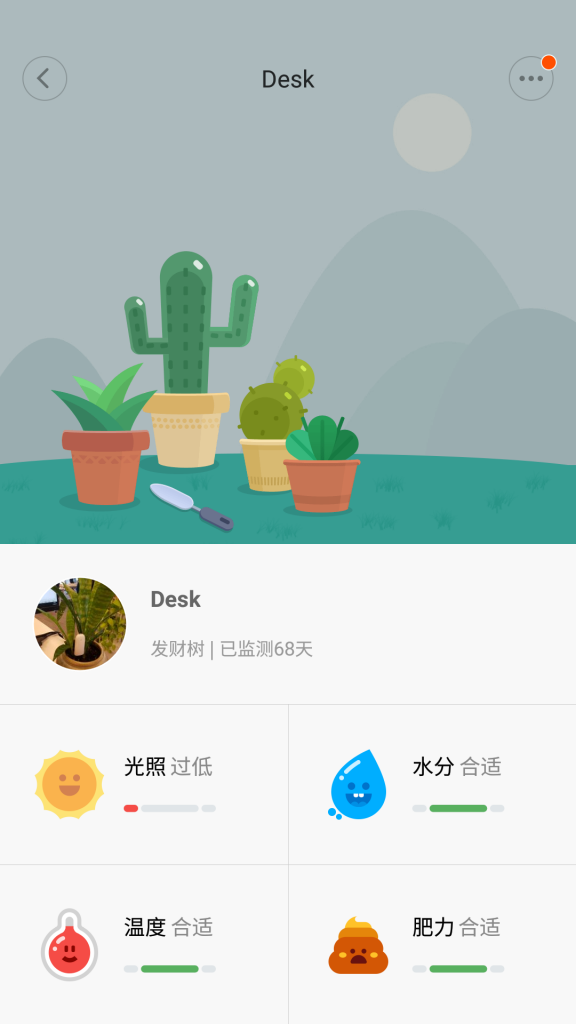
- You can now monitor your plant using the Mi Home App! 🙂


Fixing the loud CPU fan on the Dell XPS 15 9550 (2016)
Update (11/01/2019): I purchased a Razer Core X eGPU + GeForce GTX 970, with the eGPU connected fan noise is no longer an issue as all GPU processes are done over Thunderbolt 3.
I’ve had my XPS 15 9550 almost 18 months now, here’s my replacement history so far… all covered under Dell’s Premium Support NBD contract:
- 5 motherboards
- 1 battery
- 2 CPU fan
- 2 graphics card fan
- 1 heatsink
- 1 keyboard
I can put at least 3 of the above motherboard replacements down to me telling them “the CPU fan is too loud” which was blamed by Dell Support and on-site technicians on issues with the motherboard and promptly replaced.
The fix for the loud CPU fan – especially when a Thunderbolt device is connected – is to turn on passive cooling within Power Options and using Intel XTU undervolt the CPU 0.100 V dramatically lowering the thermal profile of the XPS 15 9550 followed by setting Dell Command Power Manager to Quiet.

Today I have a silent machine with no noticeable effect on daily usage or CS:GO gaming performance, that’s with 2 Dell U2414H monitors occupying the HDMI and Thunderbolt connectors. I have multiple Chrome tabs open (10+), Slack and other typical CPU hogs running without the CPU fan attempting to rise off the desk.
Here’s how to fix the loud CPU fan on the Dell XPS 15 9550:
Part 1: Turn on passive CPU cooling
- Right click the battery icon in the start taskbar
- Select Power Options
- Click Change plan settings beside the Balanced power plan
- Click Change advanced power settings
- Expand the Processor power management list
- Expand the System cooling policy list
- Set the On battery and Plugged in options to Passive
- Click OK to save changes
- Click Save Changes on the Edit Plan Settings window to save changes
Part 2: Undervolt the CPU 0.100V

- Download the Intel Extreme Tuning Utility from the Intel website
- Install and open Intel Extreme Tuning Utility (ala Intel XTU)
- Open the Advanced Tuning > Core section
- Find the Core Voltage Offset slider
- To the right of the Core Voltage Offset slider hover over the 0.000 V value to show the decrease/increase toggles
- Click the decrease toggle until the Core Voltage Offset indicator shows -0.100 V
- Click Apply
- Close Intel XTU and restart the computer
Part 3: Dell Command | Power Manager

- Download and install Dell Command | Power Manager from Dell’s website
- Open Dell Command Power Manager from the Start menu
- Switch to the Thermal Management tab
- Set the Thermal Setting to Quiet
That’s it! 😀

How to turn off the Mazda Connect watchdog (auto-reboot)
By default Mazda Connect’s Watchdog service restarts the CMU on any error, to the general public this is a god send as the Watchdog resolves common issues by rebooting the system (e.g. Navi going silent, any screen lock-ups, etc.) but for developers this can have the unintended action of locking us out of SSH access from a simple mistyped character.
Here’s how to turn the Mazda Connect Watchdog service off, keep in mind this command only persists until the Mazda Connect system is rebooted (e.g. after turning the engine off for a short period of time).
echo 1 > /sys/class/gpio/Watchdog\ Disable/value
You can check if the Watchdog service is now inactive by running:
cat /sys/class/gpio/Watchdog\ Disable/value
There are ample instructions online for how to set up the above command to persist even after rebooting but I won’t provide this here.
That’s it! 🙂
Resetting SSH access after “Too many authentication failures for …” on Google Cloud Compute Engine
Locked yourself out of SSH/SFTP access on Google Cloud Compute Engine? Does the below look familiar… Fun times…
Status: Connecting to domain.com...
Status: Connecting to domain.com...
Response: fzSftp started, protocol_version=8
Command: open "...@domain.com" 22
Error: Server sent disconnect message
Error: type 2 (protocol error):
Error: "Too many authentication failures for ... from 125.18.17.115 port 7145 ssh2"
Error: Could not connect to server
Here’s how to increase the number of allowed login attempts within sshd_config and then restart the sshd service so you can get back to work. 🙂
- Open up Google Cloud Console
- From the Menu button open Compute Engine > VM Instances
- Beside your Compute Engine instance hit the SSH button within the Connect column
- When your terminal connection is established enter the following:
sudo nano /etc/ssh/sshd_config
- By default the sshd_config file does not have a MaxAuthTries entry but scroll through the file using the up/down keys and check just incase…
- I set the maximum number of login attempts to 10, change this number to suit your security needs. Add the following lines anywhere within the sshd_config file:
# Max login attempts
MaxAuthTries 10
- Save and close the file by using the following keyboard combinations:
CTRL+O followed by the enter key to save the file changes
CTRL+X to close the Nano file editor
- Reboot the sshd service using the following commands (I’m not sure which one works so let’s do all of them…)
sudo service sshd restart
sudo systemctl restart sshd
- Try and reconnect to your Compute Engine instance using Putty (SSH) or Filezilla (SFTP)
That’s it 🙂