Hobbyking Predator 650 equipment list
Frame
Control Board
- ArduPilot Mega 2.6
- uBlox LEA-6H GPS with Compass
- GPS Mast for uBlox LEA-6H
- Power Module for ArduPilot (4S)
Motors
- Turnigy Multistar 2814-800Kv 123 (HobbyKing didn’t stock the 2814-800Kv so I pulled the trigger on the smaller 2214-800Kv, not ideal as the motor mounts don’t all line up but close enough, in hindsight should have waited for the 2814-800Kv)
- NTM 28 Carbon Fibre Motor Mount (as above, used the cross mount from this kit to mount the Turnigy motors with holes 16mm & 19mm to the Predator 650 motors mounts with holes 19mm & 25mm, no motor mount screws are provided so used screws scavenged from previous builds to mount the the cross mount to the motor mounts, if you get the 2814-800Kv motors mentioned above you mount directly onto the motor mounts)
Speed Controllers
Propellors
- 12 x 4.5 Slow Fly Nylon Propellers (Scavenged from retired X525 build)
Battery
Radio
- Turnigy 9XR Transmitter Mode 1 (No Module) (Scavenged from retired X525 build)
- FrSky DF 2.4Ghz Combo Pack for JR w/ Module & RX (Scavenged from retired X525 build)
- 3DR Radio Set (433mhz for Europe) (Scavenged from retired X525 build)
FPV
- Fatshark 600TVL High Resolution FPV Tuned CMOS Camera
- BOSCAM 5.8Ghz 8-channel 200Mw video transmitter
- BOSCAM 5.8Ghz 8-channel FPV goggles (superseded by Skyzone 5.8GHz FPV Goggles)
Miscellaneous
- Signal loss Alarm & Lost Plane Finder
- On-Board Lipoly Low Voltage Alarm 2s~3s
- Wire Mesh Guard Black 10mm (use the mesh to protect the motor leads when exposed at the end of each motor mount)
- 3.5mm Male/Female Bullet Brushless Motor Extension Lead 200mm
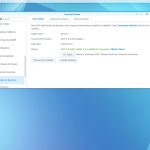
Fix for DSM 5.0 and 5.1 updates failing on Synology NAS
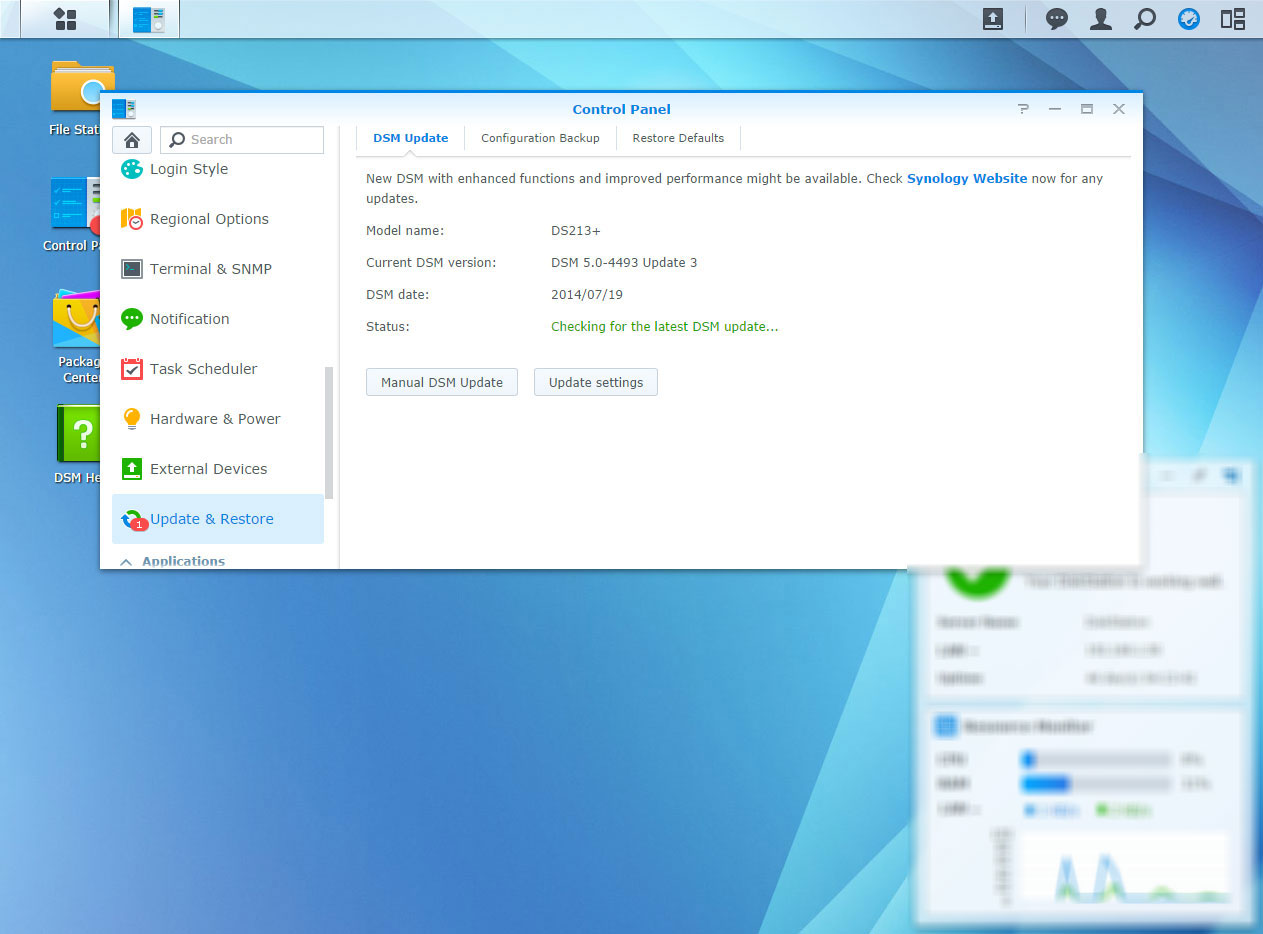
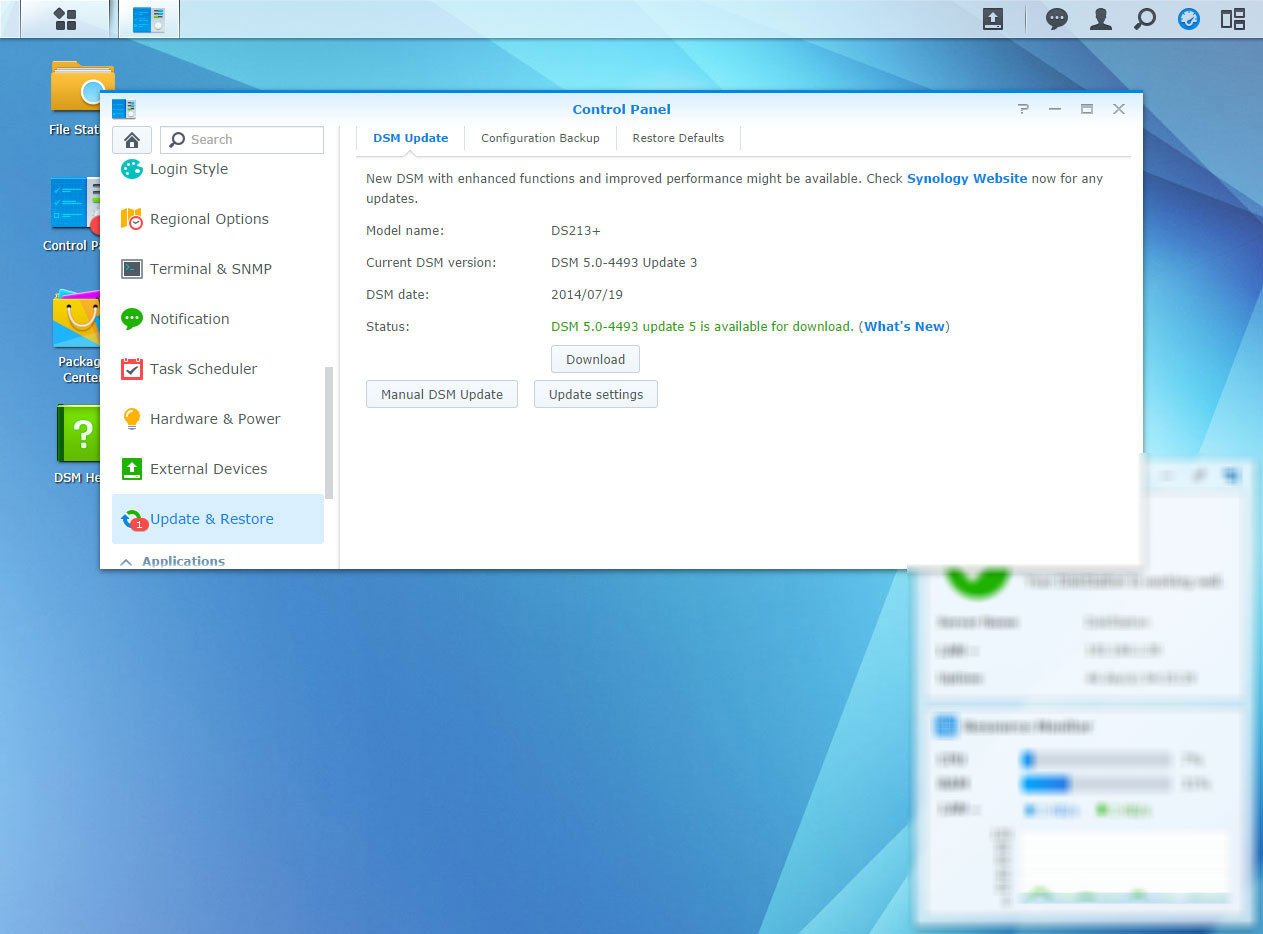
For the past several months I have been receiving regular e-mail notifications from my DS213+ that a system update is ready to be applied, I’d proceed to open Control Panel > Update & Restore with an Administrator level User account and hit Update. Nothing would happen…
-
- Checking for the latest DSM update…
-
- DSM 5.0-4493 update 5 is available for download.
-
- Failed to Download DSM. Please check your Internet connection.
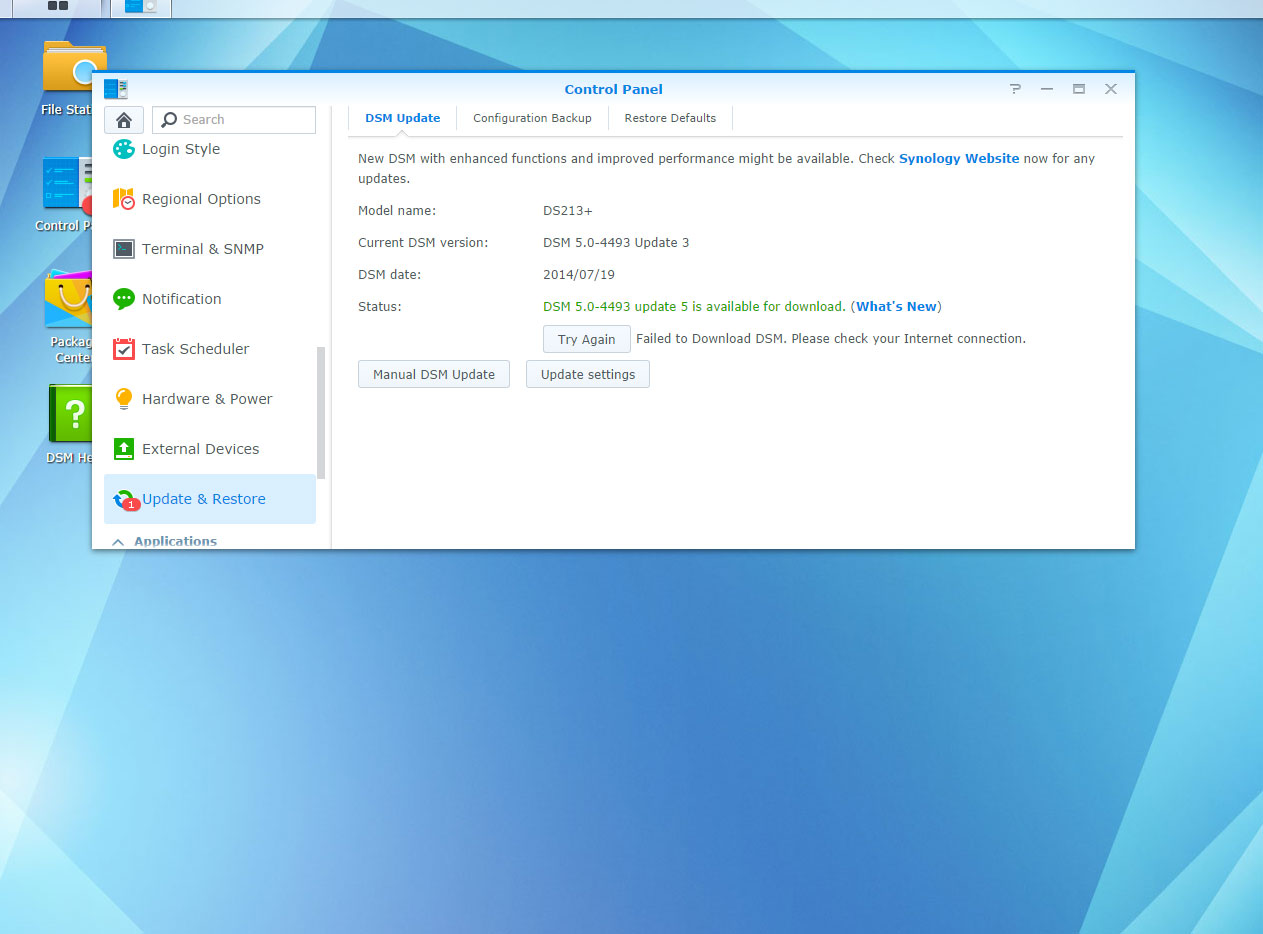
Here’s the fix straight from Synology Support which is not mentioned on any well ranked forums or posts when searching for this error. I’ve pasted the original from Synology Support as well as an English-friendly version.
If you have updated your NAS to DSM 5.0 and above there is no security/malware concern to be worried about. If you are receiving e-mail notifications that a new system update is available but it does not appear on the Update & Restore screen please do the following:
- Open Control Panel > Network as an Administrator level User account
- Under the DNS options on this screen set the following primary and secondary DNS entriesPrimary: 8.8.8.8
Secondary: 8.8.4.4 - Click Save Changes
- Open Control > Update & Restore and click Update Now
Original response from Synology Support:
If you have managed to update system to DSM 5.0 there has security concern that needs to be worried. On the other hand regarding e-mail you received has a new software for update but no update was available on system, please apply Google DNS 8.8.8.8 or 8.8.4.4. for your DiskStation under Control Panel > Network > General (Preferred DNS Server) for changes to take effect. Then, check if the issue resolves then. – Technical Support, Synology
Update: This post seems relevant for DSM 5.1 users too…
Trends in persistent WordPress Administration notices
I’ve been helping out store owners in maintaining their stores for a little while now and the trend for Plugin and Theme developers to introduce persistent WordPress Administration notices for non-critical site activities or inappropriate site wide notices is becoming too common. I want to bring this to the attention of other WordPress users so that this can be addressed.
A ‘good’ developer will limit persistent notices to critical site activities only (e.g. caching Plugins, major database updates).
In the above case WooThemes Subscription and Envato’s Theme notices are considered critical; subscription sales won’t work and the Theme will be missing core functionality without addressing those notices.
Configuring default options for a CSV exporter or installing a Plugin update helper isn’t a critical activity.
A ‘great’ developer will still add the ability to dismiss these notices even in the case of a critical site activity.
Envato’s Theme and SkyVerge have added a dismiss option with their exporter setup notice but in SkyVerge’s case the notice does not need to be on all screens or considered an error. Dropping the error CSS class and limiting this setup notice to just the Plugins, Dashboard > Updates and own CSV Export screens would be better.
WooThemes don’t offer a dismiss option at all which makes for unnecessary nagging and screen clutter and goes against the WordPress Plugin Guidelines.
It’s fine to put an error message at the top of the admin for special cases, but it should be linked to a way to fix the error and it should be infrequent. Any form of “nagging” is absolutely prohibited.
That’s my rant. I’ll add an option to the next release of Store Toolkit for WooCommerce to hide that persistent notice so this post isn’t all for a lost cause.
Finally a Fix for XAMPP and WordPress Permalinks
Error 500 – Server error!
Fun times with Apache… Recent releases of XAMPP for Windows hide additional Apache overrides outside of the reach of …/apache/conf/httpd.conf. If you’re like me and exhausted all prior Google results to get Permalinks working with XAMPP give this one a go.
- Open …/apache/conf/extra/httpd-xampp.conf
- Replace all instances of AllowOverride None and AllowOverride AuthConfig with AllowOverride All
- Save changes
- Open XAMPP Control Panel and restart the Apache service or open the Windows Services dialog and restart the Apache2.4 Service
- Breathe and give that Error 500 tab a refresh
Woop! In case this doesn’t work it’s likely you’ve missed one of the basics:
- Open …/apache/httpd.conf
- Uncomment #LoadModule rewrite_module modules/mod_rewrite.so
- Replace all instances of AllowOverride None and AllowOverride AuthConfig with AllowOverride All
- Save changes
- As above, restart the Apache Service.
Fix for Adobe Flash Player crashing under Chome 31 and above
So you’ve updated Chrome (version 31+) and re-installed Adobe Flash Player (version 11.9 r900+) a countless times yet web pages with Flash still crash? Welcome to my world.
If Chrome has for whatever reason decided to not play nice with Adobe Flash Player ala Shockwave Flash try this trick out, turns out it worked for me and doesn’t leave you simply disabling Flash content like other YouTube fixes…
- Via the Chrome Address Bar enter ‘chrome://plugins’ and press enter
- From the Plug-ins screen that opens in your browser tab click Details from the top-right corner of the screen
- Under ‘Adobe Flash Player’ check if it says ‘2 files’ beside the Plug-in name and version
- If it does say 2 files hit Disable for the ‘file’ that has a Type of ‘PPAPI’
- Open a web page that has a tonne of Flash content… hooray!
That’s it.
Hidden bbPress Admin menus conflict due to WP e-Commerce
If you have a WordPress site that has previously been using WP e-Commerce (version 3.8.13 and and earlier) upon activating bbPress you will notice, well, no bbPress menus or references. Anywhere.
Update: You may get a “You have insufficient WordPress permissions” notice when activating bbPress, the following steps will fix this conflict with WP e-Commerce.
Earlier releases of WP e-Commerce adjusted the default role capabilities of WordPress User’s which for one reason or another – I am yet to identify the exact cause – results in bbPress not loading it’s welcome script (e.g. creating new default Pages, intro screen, WordPress Admin menu’s, etc.). Here’s the fix.
- Install and activate User Role Editor from Plugins > Install within the WordPress Administration
- Open Users > User Role Editor
- Click Reset
- De-activate and re-activate bbPress
That’s it!
Don’t do e-Commerce Plugin releases on Christmas Day or before Holidays
Just don’t do it. Here’s why in 3 concise reasons:
- Store owners don’t update their stores during peak season
- Limited support staff are around to help store owners
- Store owners that have updated their stores, and haven’t done backups, which then run into problems are going to flip out
Tips for LCD replacement of iPhone 4S
Golden rule: The LCD and front glass panel on the iPhone 4S are fused together, without specialised/expensive equipment it simply cannot be done; I tried… Save your $3 USD purchasing the standalone front glass panel and put it towards the full LCD + front glass panel costing $20 USD.
I have had no prior experience working with iPhone hardware so these are my ‘watch out for!’ recommendations when replacing the LCD screen and front glass panel on the iPhone 4S and perhaps above.
- The screws holding the LCD frame to the phone body and beyond small. Use a magnetized screwdriver or give coffee the break for a few hours before getting to work!
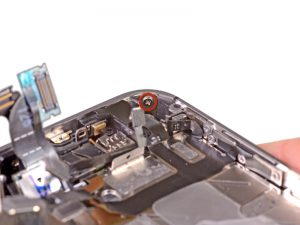
Reference: Replacing iPhone 4S Display Assembly by iFixIt
- The loop on the digitizer ribbon cable that goes from the LCD through the housing body loves to get caught, make sure both the digitizer and display ribbon cables are the same length after threading them through the housing body, If they’re not, the digitizer loop probably got caught.

Reference: Replacing iPhone 4S Display Assembly by iFixIt
- If you are replacing the LCD and front glass panel with a different colour it’s safe to assume you might replace the round home button too, if so make sure the metallic grid that sits behind the original home button comes across, otherwise you’ll end up with a dud home button, plus you have to pull the housing apart again just to get at that home button again… I learnt that one the hard way.

Reference: Replacing iPhone 4S Display Assembly by iFixIt

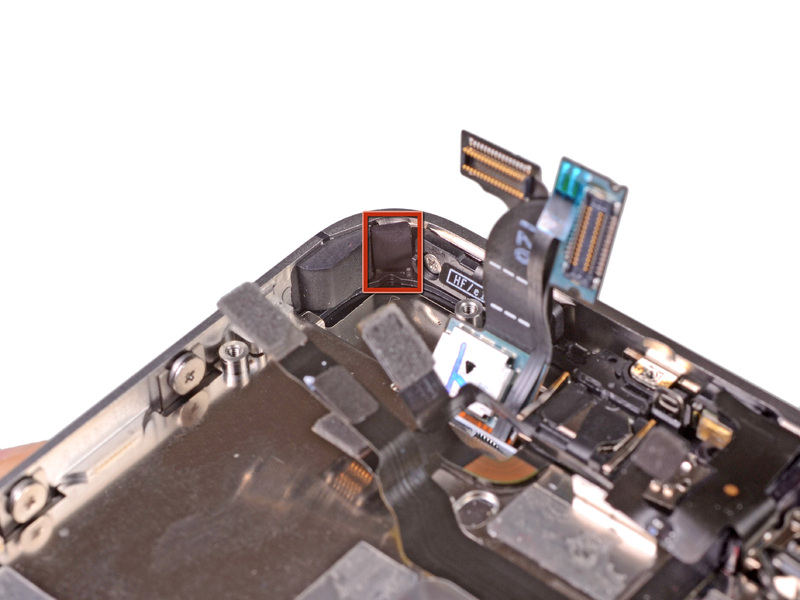

Photo Station connection error with DSM 4.3
For new users setting up a DiskStation instance getting packages to play nicely with the DSM firewall is a little tricky. By default all ports in use by existing packages are disabled when the DSM firewall is enabled and on the first instance that each is used again you are notified with a prompt to allow future use, the problem is that this only happens when you re-start each service or after a system reboot. Here’s the fix.
- Connect to the Administration of your Synology Diskstation as an Administrator group user (e.g. admin)
- Open Package Center from the Main Menu
- From the Installed list select Photo Station
- Under the Actions dropdown select Stop, wait until the Status changes to Stopped
- From under the Actions dropdown again select Start
That’s it, open Photo Station from your browser!
Fix for “Failed to connect to the target server.” error notice within Data Replicator 3
If during first time setup you have enabled the DSM 4.3 firewall on your Synology Diskstation then connecting Windows services (e.g. Data Replicator 3, Cloud Backup, Install Assistant, etc.) requires you to open those ports so that the two can communicate, this is why likely why you’ve run into the famous “Failed to connect to the target server. Check the network or server setting” error message when setting up Data Replicator 3. Here’s the fix:
- Connect to the Administration of your Synology Diskstation as an Administrator group user (e.g. admin)
- Open Control Panel > Firewall and QOS within the Network Services group
- Within the Allow / Deny tab ensure that the entry starting with “Synology Assistant, etc.” is enabled with Protocol set to All, Source IP set to All and Action Enabled
- Save changes
- Connect to your DiskStation via Data Replicator 3
That’s it!